|
|
 |
« on: June 28, 2011, 09:47:26 PM » |
|
I would like to paint my two Aeons Black and gold but I heard AL is hard to paint. Any sugjestions? I also don't want the paint to get worn fast.
|
|
|
|
|
 Logged
|
|
|
|
|
Mystime
Knight Aspirant

Force Alignment: 0
Posts: 10
|
|
« Reply #1 on: June 29, 2011, 01:35:58 PM » |
|
I helped my friend paint his SI and we simply applied primer, let it dry, and 2 coats of the color choices. We were painting it a jet black. It came out fine. Just make sure you do not do it too thick. I am on the fence about painting my Initiate V2 LE that is coming in.
|
|
|
|
|
Logged
|
|
|
|
|
|
|
|
« Reply #2 on: June 29, 2011, 02:42:38 PM » |
|
Depending on budget and such, the most durable way will actually be to either anodize or powder coat. Neither is really a DIY option for most folks though, and both would require complete disassembly of your saber to be done.
|
|
|
|
|
Logged
|
-=Growing Arsenal=-
Dark Std Issue V2 AB Perditio
Bellicose BR / AS unnamed
Dark Initiate V2 VA Incipio
Gifted
Aeon v2 AS Purgatrix
Dominix V2 BR Profanitrix
|
|
|
|
SILVERBACK
Knight Commander

Force Alignment: -77
Posts: 839
i like dark side points and cookies
|
|
« Reply #3 on: June 30, 2011, 12:51:29 AM » |
|
before painting clean the hilt with a little rubbing alcohol to get off any oils from your hands. there is really no need to prime but if you want to you can , it wont hurt. just use an enamel spray paint, i prefer rustoleum. two or three coats should be good, lightly sanding with a fine steel wool (000) between coats. make sure the paint is thoroughly dry before sanding. when you are done just use a couple of coats of clear coat to protect the paint from wearing too fast, it wont keep it looking perfect forever. it depends on how much dueling you will be doing , you can add more clear coats if you want but remember the hilt will be pretty slick so you might want to add some sort of grip. good luck, and hope to see some pics when you are done.
|
|
|
|
|
Logged
|
|
|
|
|
Abate
Knight Lance Corporal

Force Alignment: 2
Posts: 50
Dark side points please
|
|
« Reply #4 on: July 03, 2011, 12:42:43 PM » |
|
you could always look up a paint baking tutorial though you would have to pull all the electronics out to do so also youd need an oven you werent ever goin to use for food again
|
|
|
|
|
Logged
|
Prophecy Ce Guardian Blue /Le Blazing Red Staff
Dark Liberator Violet Amethyst/SI Blazing Red Staff
Dark War Glaive quick disc
Bane Obsidian quick disc
Dark Shock Obsidian Pyrestone Orange
|
|
|
|
Rogue Jedi
Knight Apprentice
Force Alignment: 0
Posts: 26
|
|
« Reply #5 on: December 15, 2011, 06:03:40 PM » |
|
I have multiple sabers I would like to paint, and a search revealed this thread. For those who painted their sabers: How did work out? In my experience, painting aluminum (for a lasting quality finish) involves etching primers followed with zinc bathes, concluded with a deionized water rinse. I would like to apply a 3M rubberized undercoating to the "grip" area of the hilt. Anyone have experience doing this?
|
|
|
|
|
Logged
|
|
|
|
|
Duff Man
The Double Triple X 4 + Fish OG of Randomness Version 2.7 of part 9 = Bacon
Knight Commander
Force Alignment: -358
Posts: 1513
|
|
« Reply #6 on: December 16, 2011, 09:17:43 AM » |
|
But remember when you do it you have to sing this
| <a href="http://www.youtube.com/watch?v=SfmAzoILaK8" target="_blank" class="aeva_link bbc_link new_win">http://www.youtube.com/watch?v=SfmAzoILaK8</a> | and replace "roses"with "Saber" and "red" with whatever color you're doing it...unless of course it is red.  |
|
|
|
|
Logged
|
Ultra Saber SI Staff:Guardian Blue
Ultra Saber Redemption:SRD
Ultra Saber Dominix V2 LE:Dark VA
MR Construction Kit:RGB
|
|
|
|
Rogue Jedi
Knight Apprentice
Force Alignment: 0
Posts: 26
|
|
« Reply #7 on: December 27, 2011, 06:28:14 PM » |
|
After a few weeks, 3 "ordinary" prophecy lightsabers are now extraordinary.
After speaking with a machinist, who routinely works with aluminum, & a bike shop which paints metal frames, I thought I would share what I have learned.
For lightsabers which have seen heavy battle (read: deep marks & pits) start reading here, for lightsabers which have just been purchased skip down.
Begin with a fine "single cut" file, lifting the file after each stroke, to ensure a uniform surface (file was purchased at Lowe's - $10)
Dry sand with 600 grit (purchased at Lowe's - $8)
(take a trip to AutoZone and visit the paint section to purchase wet sand paper multipack and aluminum/metal polish - $15)
Using a lubriciant (TriFlo (has teflon)- $8) wet sand with 1000 grit
Using a lubricant, wet sand with 1500 grit
NEW SABERS start here
Using a lubriciant, wet with 2000 grit
Using a lubriciant, wet with 2500 grit
Finish with the aluminum polish
The end result is a mirror finish surpassing the nickel plating finish.
My personal touch was to tape the depressions in the handle, which are polished, with masking tape and dry sand the handle with 300 grit. After cleaning with Acetone, I taped the rest of the saber. Rustoleum flat-black textureed spary paint was applied to the handle. And I promply removed the taped sections of the depressed grooves, again, which are mirror polished.
!! Spectacular results !!
For a bit of contrast, I dry sanded the raised "button portion" of the saber with 600 grit, which offers a lovely "brushed" aluminum finish.
The remaining 2 prophecy sabers, forming a prophecy staff, I inverted the handle color scheme. The depressed grooves are sprayed with flat-black texutured paint, while the hanlde was drysanded with 600 grit.
Each saber, from start to finish, took about 6 hours of work. A great weekend project, or couple nites a week.
A great way to customize your saber.
|
|
|
|
|
Logged
|
|
|
|
|
Gaius
Knight Officer

Force Alignment: 6
Posts: 147
Hello Jedi. How nice of you to drop in.
|
|
« Reply #8 on: December 27, 2011, 07:15:59 PM » |
|
Sounds like very nice, rewarding work. I'd love to see some pictures.
|
|
|
|
|
Logged
|
Raven, Blazing Red, SS Pommel, Obsidian- Sekarasu
Archon v.2- Guardian Blue, DVA or SRD- QD, Obsidian- Lior
Prophecy, violet amethyst - [Name To Be Determined]
Dark War Glaive, Pyrestone with silver FOC, Obsidian, Black Claws red A/V- Enfer
|
|
|
|
Rogue Jedi
Knight Apprentice
Force Alignment: 0
Posts: 26
|
|
« Reply #9 on: December 29, 2011, 12:57:18 AM » |
|
Tried posting a few pics. For all my efforts, I was rewarded with a big red "x".
I'll try again in a day or so.
|
|
|
|
|
Logged
|
|
|
|
|
Rogue Jedi
Knight Apprentice
Force Alignment: 0
Posts: 26
|
|
« Reply #10 on: January 02, 2012, 03:05:44 AM » |
|
Here is the finished double-bladed prophecy. 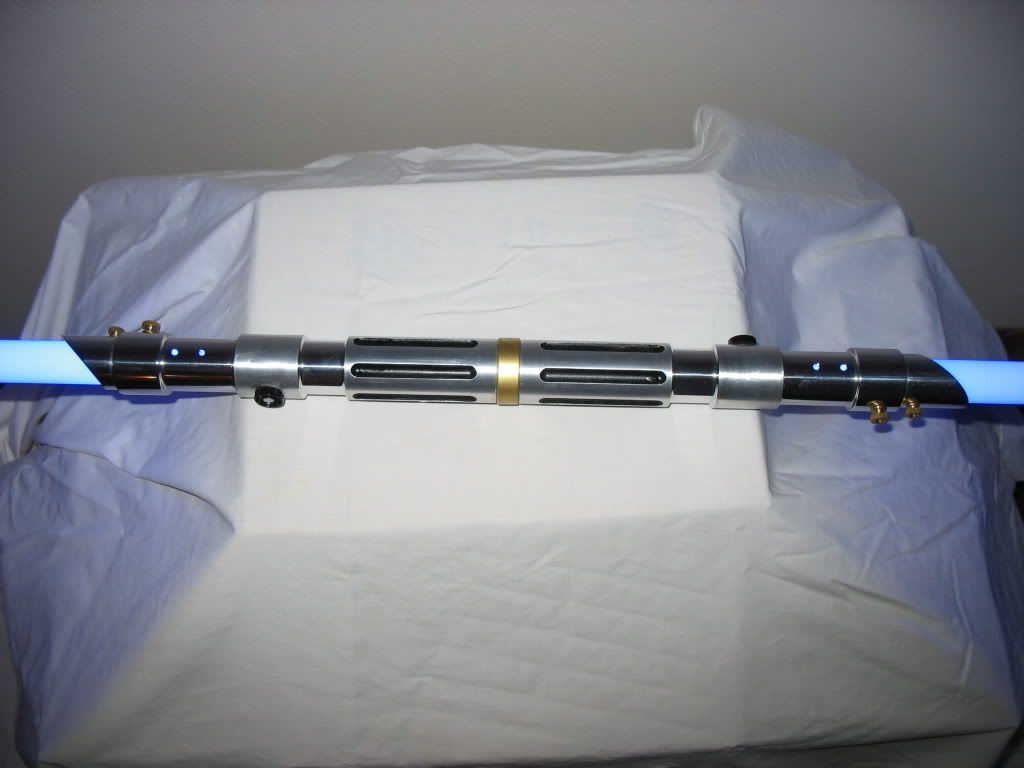 |
|
|
|
|
Logged
|
|
|
|
|
Rogue Jedi
Knight Apprentice
Force Alignment: 0
Posts: 26
|
|
« Reply #11 on: January 02, 2012, 03:07:32 AM » |
|
Here is a closer look at the one of the prophecy sabers.  |
|
|
|
|
Logged
|
|
|
|
|
ThreadJack
Lady of the Order Aeon
SaberForum.Com Moderator
Knight Commander OVER 9000!!

Force Alignment: 809
Posts: 13796
Truly, she will be strong- A luminous being is she
|
|
« Reply #12 on: January 02, 2012, 03:09:16 AM » |
|
That can out very nicely. I like.
|
|
|
|
|
Logged
|
(Sig by me!) Now accepting dark side points. |
|
|
|
Rogue Jedi
Knight Apprentice
Force Alignment: 0
Posts: 26
|
|
« Reply #13 on: January 02, 2012, 03:11:20 AM » |
|
I was trying to get an angle that would capture the polished portions, brushed portions, and texture painted portions.  |
|
|
|
|
Logged
|
|
|
|
|
Rogue Jedi
Knight Apprentice
Force Alignment: 0
Posts: 26
|
|
« Reply #14 on: January 02, 2012, 03:17:16 AM » |
|
That can out very nicely. I like.
Thank you. All compliments graciously received. I will post pics of my 3rd prophecy, tomorrow (it's at the office). My 3rd prophecy was actually my first customization, the handle is flat-black textured paint while the depressed groves are polished to a mirror finish. It's hard to capture the mirrored/polished finish with a flash. |
|
|
|
|
Logged
|
|
|
|
|
|


