In this tutorial, I will be taking you through the process of creating images that one might receive when doing a photoshoot in a studio. The question is, what makes such a picture what it is or what separates studio-quality pictures from regular pictures? The answer is good use of lighting. I will be using examples of pictures I've taken to explain what I mean.
Here is an example with average/ok lighting:

Here is an example with good lighting:
As you can see, there is a dramatic difference between the two. The first pic was shot with an overhead ceiling fan light filling the entire room, whereas the second was shot with two light sources (an LED work light and a phone LED light) in a darkened room. Both images were taken in the same room, the only difference being the lighting changed. Now I will get into the actual tutorial section of this. If you wish to try your hand at making studio-quality images, there will be some things you'll need in order to do so.
I. Things You Will Need
1. A camera with the ability to manually change ISO and Shutter Speed settings.
Obviously if you want to take good pictures, you need a camera. However, it is important that the camera you use have the capability of allowing you to change its ISO and Shutter Speed settings manually. The reason for this is because both play an integral part in controlling the light to achieve the shot you want to take. I will not get too detailed as to what each setting does, but basically, the ISO value determines how much noise or grain is in an image and the Shutter Speed is how quickly the shot takes. You want to aim for a relatively low ISO (400-1000) to keep a lot of noise out of your images and a relatively fast Shutter Speed (1/5 of a second to 1/20 of a second) to keep your images sharp enough.
2. Two light sources
As we've seen, good lighting can make all the difference between an ok image and a great image. The question is, what do you use for light sources and where do you put them? Actual studio lights can be a little too expensive for most people, so what other options are there? You'll be pleased to hear that there are very cheap options to achieve very similar effects to studio lighting. The cheapest of all is actually free, which is using a window to light whatever subject you are shooting. Most windows on a sunny or slightly overcast day can provide excellent lighting for any shot. Another good light source I've found to use is an LED work light, which can be purchased in most stores for around $20 with varying amounts of LEDs and power options. And when you really get desperate or are on a tight budget, you can always use the LED flash on your phone if it has one. Other options are flashlights and even the saber itself you are shooting with.
3. Tripod or some stable surface to set camera on
Without some form of a way to stabilize your camera, your images will likely turn out blurry to some degree. If you look at studio images, they are always sharp, so you want to make sure your camera doesn't move when taking pictures, especially if you have to use a slower Shutter Speed. With enough light however, a faster Shutter Speed is able to be used, which helps in taking sharper images.
4. (Optional) Any version of Photoshop or program used to cut out images
This is optional only if you want to cut out your subject and place it on other backgrounds.
II. Single Light Images
This section will cover the various ways to position and use a single light source, whether it be a window, a flashlight, a work light, an LED flash from a phone, or a saber. I'll be showing images with different lighting positions so that you can see how the positioning of the light affects the look of the shot.
1. Front Lighting

This type of lighting involves the light source coming from the direction the camera is shooting from. This can be the flash on the camera itself or an external light source near where the camera is. If you are using the flash on the camera, you will usually get pretty flat lighting that is typical of most images. Having an external light source is advantageous because you can position it wherever you like, as well as different elevations above or below the subject for different lighting effects. The image below was taken with a single light just below the camera.

2. Side Lighting

This is where having an external light sources comes in handy. Being able to position your light source lends itself to more dramatic shots. The image below was shot with an LED work light to the right of the subject.

3. Back Lighting

Often times, back lighting will not really be used, but it is worth mentioning here. It is mainly used along with other light sources that illuminate the front or sides of a subject and less by itself. When used by itself, it has more of a silhouette effect. This shot was done with a single light source behind the subject.

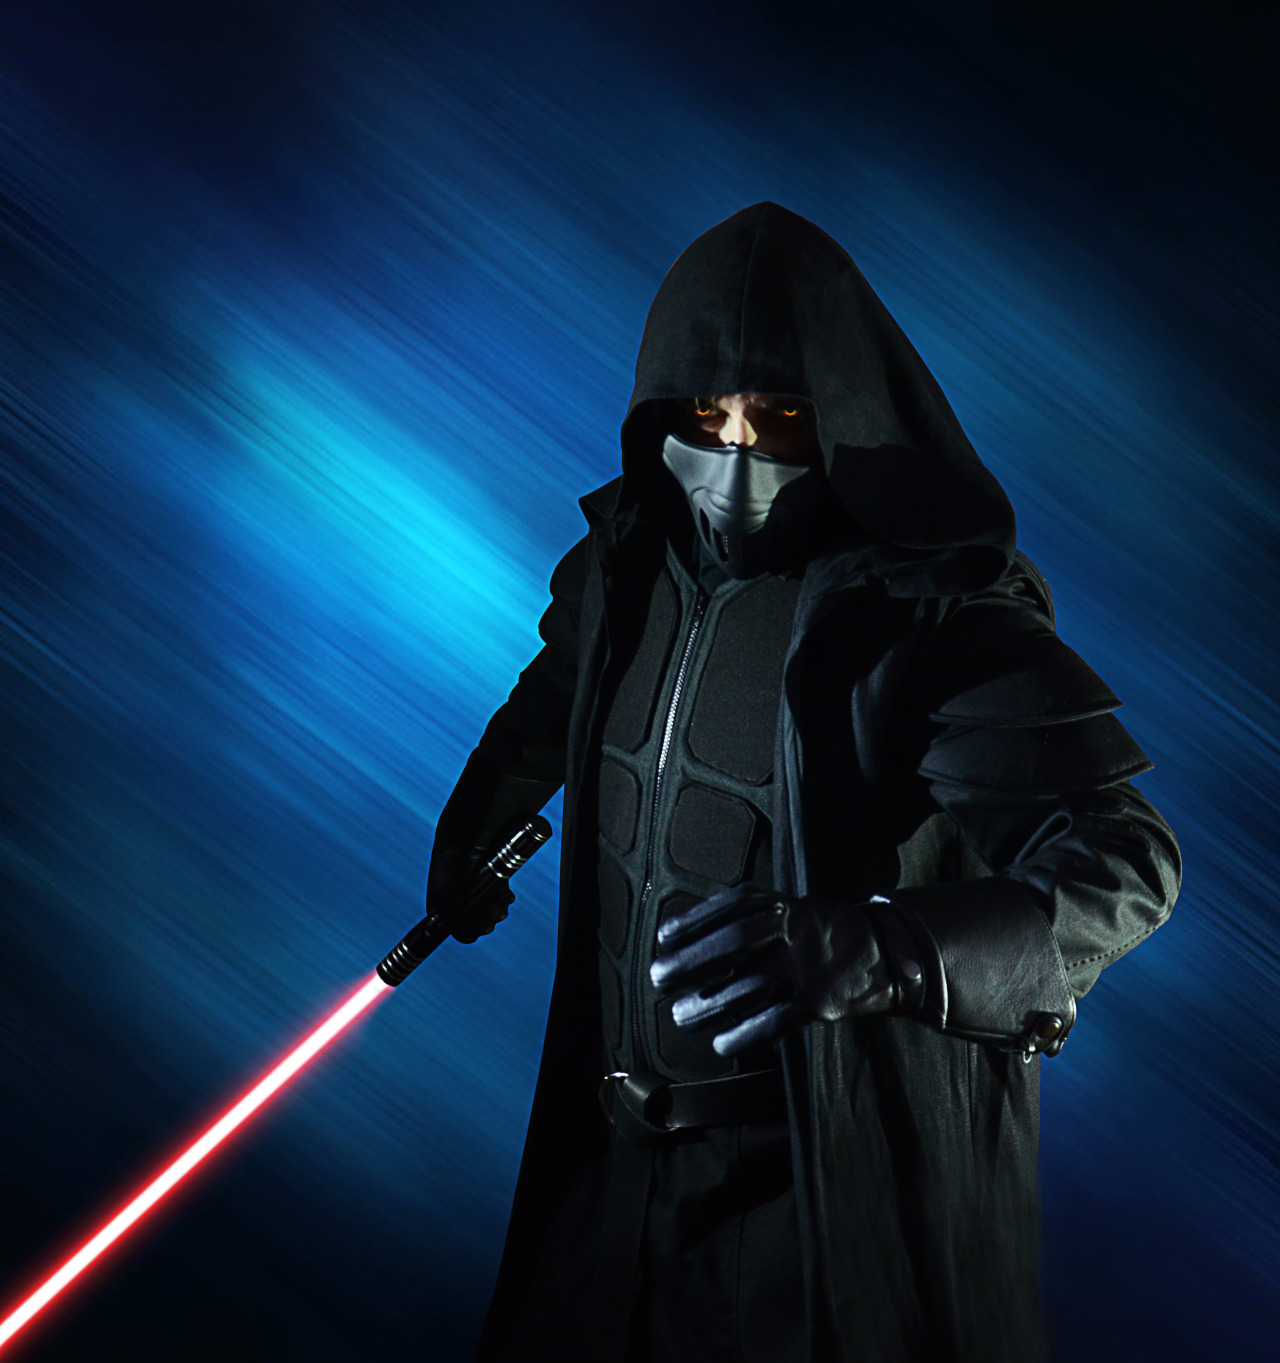
4. Saber Lighting
This is pretty self-explanatory. Saber lighting is when the saber you are using is the only light source in the shot. The Shutter Speed and ISO settings you use with saber shots will change how the saber looks in the actual shots. A high ISO and a longer Shutter Speed will result in more of the white core of the blade showing, whereas a lower ISO and faster Shutter Speed will result in more of the actual blade color showing. The image below is an example of this type of lighting.

III. Two Light Images
1. Front and Side Lighting

Now we get into using two light sources, which greatly enhances the variability of the different shots you can take. This also means you have more light to play with, which in turn means the possiblity of using faster Shutter Speeds for sharper images and less noise in your shots from a lower ISO setting. Below is a shot taken with a phone LED light beneath the camera and a work light to the right of the subject.

2. Side to Side Lighting

This lighting scheme uses a light on either side of the subject and achieves very dramatic effects. These lights can be positioned diagonally from the subject or in a straight line to the subject, as shown in the scheme above. Either way produces strong effects. This shot was created using a light source on either side of the subject.

3. Front and Back Lighting

This one is simple enough, though it is not used that often because of the flat lighting from the front. It is important to mention however, so that the effect it creates can be seen. In the shot below, a phone LED light was positioned below the camera and a work light behind the subject.

Optional Steps
IV. Cutting Out Images
If you have a good shot with good lighting, you can obvisouly stop there if you want, but sometimes the background you shot against just isn't as interesting as the subject and can therefore become a distraction. This is when knowing how to cut your subject out of the background onto a new one comes into play. The best program I've come across to do this is Photoshop. Any version will work and there are several ways of going about cutting your subject out. If you shot your images against a solid background with a different color than the subject, you can easily remove the background with a few clicks. If the background is more complicated however, then the pen tool becomes your best friend. Here is a video detailing how to extract a subject from a background with the pen tool.
https://www.youtube.com/watch?v=6WJj6iNr6K0&list=FLR1bX1OucgsmuuBmdcNU5kw&index=1Once extracted, you should now have only your subject, which you can then place against whatever background you choose. I have chosen one of my images from above and have cut the subject out of the background to do just that.

V. Choosing A Background
When choosing a background, you can choose whatever you like. However, to achieve a studio-looking final image, it helps to pick a background with a similar lighting scheme to the subject in the image. If you place your subject against a background with a different lighting scheme, you will find that the final image doesn't look quite right because there are two different lighting scheme going on. This can be fixed with Photoshop to an extent, but it is best to either pick a background with a similar lighting scheme to your subject, or shoot your subject with a similar lighting scheme to an already chosen background.
Since the image I chose to use has a single light source coming from my right, I want to choose a background with a similar scheme. After choosing a suitable background and cutting my image onto it, here is the final image below.

Because I choose a background with a similar lighting scheme to my subject, the overall image works a lot better than if I had chosen one with a different lighting scheme. The two images blend together, rather than contradict each other.
VI. Multiple Subject Lighting
If you want to take pictures with multiple subjects, whether they are all present in the shot or composited, it is important to use the same lighting scheme for all of them. This is more the case when compositing different images together. An example of this would be if you have mutliple characters that you want in the same image, but have to shoot at different times. The ideal scenerio would be to shoot all subjects with the same light source, but if that is not possible, at least aim for the same kind of lighting scheme for all subjects. By this I mean if one subject is shot with a single light source from the side, then all subjects should be shot with a similar lighting scheme. Below are two images that illustrate this principle.
This image is of two of my costumed characters fighting each other. Obviously I can only shoot one character at a time, so I shot each character using a window as my light source in the same position for each character. Then I cut them out of their backgrounds into a single image.

The same window light source was used for this image as well, only this time I had four shots to take. However, it was not a problem blending them all together because I used the exact same light source for all four images. From there, it was just a matter of cutting each subject out and putting them all on the same image.

Hopefully this tutorial has illustrated how important lighting is to creating professional-looking images and how different lighting schemes can be used to vary the look of your shots. I'm always up for answering questions, so if you have any just let me know in this thread or a PM.


